• Menu
  • Skip to right header navigation
  • Skip to main content
  • Skip to secondary navigation
  • Skip to primary sidebar

Natural Fertility and Wellness

Trying to get pregnant? Learn how to prepare your body and overcome infertility.

  • Start Here
  • Fertility Help
  • Recipes
  • Books
  • Start Here
  • Fertility Help
  • Recipes
  • Books
  • Contact Donielle
  • About Donielle
  • Privacy Policy
Home » Gluten free pie crust

Gluten free pie crust

June 11, 2014 //  by Jessica

FacebookTweetPinYummlyEmail

Homemade pie crust…those words make people cringe. I. have. been. there. Especially with gluten-free pie crust!

I’m in the kitchen, covered with flour and a pile of dough that was supposed to be a crust. There is nothing more frustrating than disasters in the kitchen.

gluten free pie crust

And, agh, a pie wasn’t even worth my time. It’s never been a favorite of mine. I am a dessert kind of girl but other than a mandatory slice of pumpkin pie at Thanksgiving, I could pass it up.

Until I had a pie crust made with butter….oh.my! Total bliss! I have never had a pie melt in the mouth like that.

It takes a bit of time and patience but once you get the process down, pie crust isn’t so intimidating.

gluten free pie crust
Print Recipe
5 from 1 vote

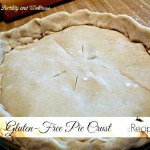
Gluten Free Pie Crust

The perfect addition to any pie filling.
Prep Time30 mins
Total Time30 mins
Course: Dessert
Cuisine: American
Keyword: pie crust
Servings: 2 crusts
Calories: 1356kcal
Author: Jessica

Ingredients

  • 2 1/2 cups gluten free flour blend
  • 2 tbsp sugar
  • 1/2 tsp sea salt
  • 2 sticks COLD butter
  • 6 tbsp very COLD water

Instructions

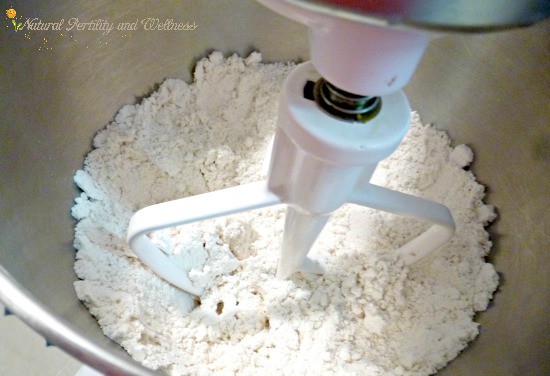
  • Mix salt, flour and sugar
  • Cut butter into flour until mixture is course.
  • Slowly add cold water, a little at a time until the dough pulls together.
  • Sprinkle a bit of flour on your counter and your rolling pin.
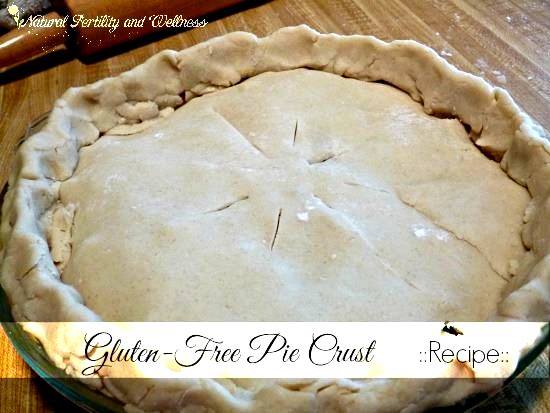
  • Cut dough in half and roll out one crust at a time.
  • Use with your favorite pie filling and bake according to pie directions.

A few helpful hints for making pie crust:

Make sure your butter and water are COLD! If they are room temperature, it’s hard to get the right consistency and then it’s easy to add too much water.

Add the water a bit at a time because the amount used is never quite the same, depending on the temperature and weather.

If your dough gets a bit too warm, put in the refrigerator to cool off a bit before rolling out.

When rolling, keep your pin covered in flour.

To pick the dough up after rolled out, gently roll it over your pin and then unroll over your pie plate.

You can use a food processor, it makes it easy to see when you’ve added enough water if you pour it in while the mixer is mixing because you can see it pull together. However, the pie crust will not be as flaky.

gluten free pie crust

Once you have the pie crust on the plate and ready to go, place the pie in the refrigerator for about 30 minutes before baking. It makes for a more flaky crust. (This is a tip from my Grandma.)

While this may seem like a lot to remember, once you get going, I think you’ll find it easy. And the pie crust is forgiving!! I have had many a pie pieced together looking kind of funky…but, if your pie tastes good, believe me, nobody will care! 😉

Some links (including Amazon.com links) in our posts might be affiliate links. This means that, at no additional cost to you, I may earn an affiliate marketing commission if you make a purchase.

Some links (including Amazon.com links) in our posts might be affiliate links. This means that, at no additional cost to you, I may earn an affiliate marketing commission if you make a purchase.

  • Bio
  • Twitter
  • Facebook
  • *Disclaimer
Jessica

Jessica

Jessica loves to learn and share about natural living, from whole foods to herbal remedies. With a desire to take care of her family through natural means, she has spent a lot of time researching and experimenting to find what fits best in her lifestyle. Struggling with her health for a few years after a miscarriage she tested positive for Hashimoto's and is currently working on healing through diet and natural supplements. Jessica started her blog Simply Healthy Home to share her family's journey to being healthy and happy.
Jessica

@SimplyHealthyJY

Follow @SimplyHealthyJY
Jessica
Jessica
Many of the links on this site are affiliate links, which mean that the owner of the site may earn a small commission from your purchase through the company. We will not recommend a company that we do not purchase from ourselves and we thank you for your support. No contributor or author on this site is a medical doctor and the statements made here have not been approved by the Food and Drug Administration. These statements are not intended to diagnose, treat or cure or prevent any disease. This notice is required by the Federal Food, Drug and Cosmetic Act. Read our privacy policy and full disclosure here.
FacebookTweetPinYummlyEmail

Category: Breads and grains, Desserts and Sweet Things, Fertility diet recipes, Gluten FreeTag: Food for Fertility

You may also be interested in these posts from the same category.

How to make elderberry syrup

make your oatmeal healthier

How to make your oatmeal healthier

green salad with dill

Simple green salad with dill

basic fertility tea for women

Fertility Tea Blend

gluten-free pancakes closeup

Healthier whole grain pancakes (includes gluten free options)

Benefits of sourdough bread and how to make a gluten-free sourdough starter

Gluten-free sourdough bread

Gluten-free, artisan, sourdough bread

how to soak almonds

How to soak almonds (and other nuts)

adrenal calming infusion

Adrenal Calming Infusion (tea for adrenal support)

super drink for endometriosis

A super drink for Endometriosis

dark chocolate peppermint brownies

Fudgy Dark Chocolate Peppermint Brownies

how to make water kefir

How to make water kefir

Previous Post: « Baby steps to going gluten free
Next Post: Three natural tips to overcome insomnia echinecea for immune system»

Reader Interactions

Comments

  1. Meredith

    June 12, 2014 at 11:17 am

    Tips from my kitchen – a GF flour blend made with at least 50% sweet (aka glutinous, but not gluten-containing!) rice flour lends the best flaky texture to GF crusts.

    Try substituting 1/4-1/2 rendered leaf lard for some of the butter. If you thought butter crusts melted in your mouth… The challenge is that the lard seems to warm up faster, making the dough harder to work with as it softens.

    I use a marble rolling pin, and no amount of flour seems to prevent it sticking to the crust, so I roll my dough between two layers of extra-wide saran wrap. It’s reliable, but a bit annoying as you have to keep peeling off both sides and re-setting the wrap as you roll, otherwise it ends up stretching with the dough and tearing.

    • Jessica

      June 17, 2014 at 6:18 pm

      Great tips!

      I have done half lard for crust and you are right, it’s good. (Except when your lard gets old and it tastes like bacon….then it’s not so good. Don’t ask me how I know this….) 🙂

Primary Sidebar

Can I help you find something?

  • Contact Donielle
  • About Donielle
  • Privacy Policy

Copyright © 2023 · Mai Lifestyle Pro on Genesis Framework · WordPress · Log in

Share this ArticleLike this article? Email it to a friend!

Email sent!